📕 Introduction
It has been some time I’ve been talking to my friend @slims about my experimentations with NixOS. Every time I mention to him that I just had to include 5 lines of code in my configuration to try a new self-hosted service, he probably feels like “HOW only 5 lines??“.
But having to commit with some local machine (like a Raspberry Pi for example) just to test the OS is such a big barrier. The other visible alternative would be to rent a VPS somewhere and install there, but for someone who isn’t yet too familiar with servers this might also be a big barrier as well! If someone could easily install it into a vm and then trash it if the interest is not there anymore, it would be way easier to play. Especially not with a configuration from scratch, but one that already had something going on.
Something from scratch would be interesting to learn it, but not now. Now the goal is to play, to roll in the dirt without fear of dirtying one’s clothes or bruising one’s knees.
So I decided to create a configuration that had something already started and make a guide on how to install it into a virtual machine on MacOS. This way I can also show this guide to whoever I talk to and the person feel curious to try Nix. If you don’t have a MacOS to follow this specific guide but have a Linux machine instead, try fasterthanlime’s blog series Building a Rust service with Nix.
If you are still there reading, I invite you to try together the NixOS Balatro! The name is because @slims likes Balatro so much that I decided to name the configuration after it. 😂
💿 Download the softwares
Go to the NixOS official website and download NixOS Minimal ISO image for 64-bit ARM (assuming you have a Silicon MAC), or just run the command below.
curl https://channels.nixos.org/nixos-24.11/latest-nixos-minimal-aarch64-linux.iso --location --output ~/Downloads/latest-nixos-minimal-aarch64-linux.iso
Download UTM, either in the UTM’s official website or using brew like below.
brew install utm
🖥️ Create a virtual machine
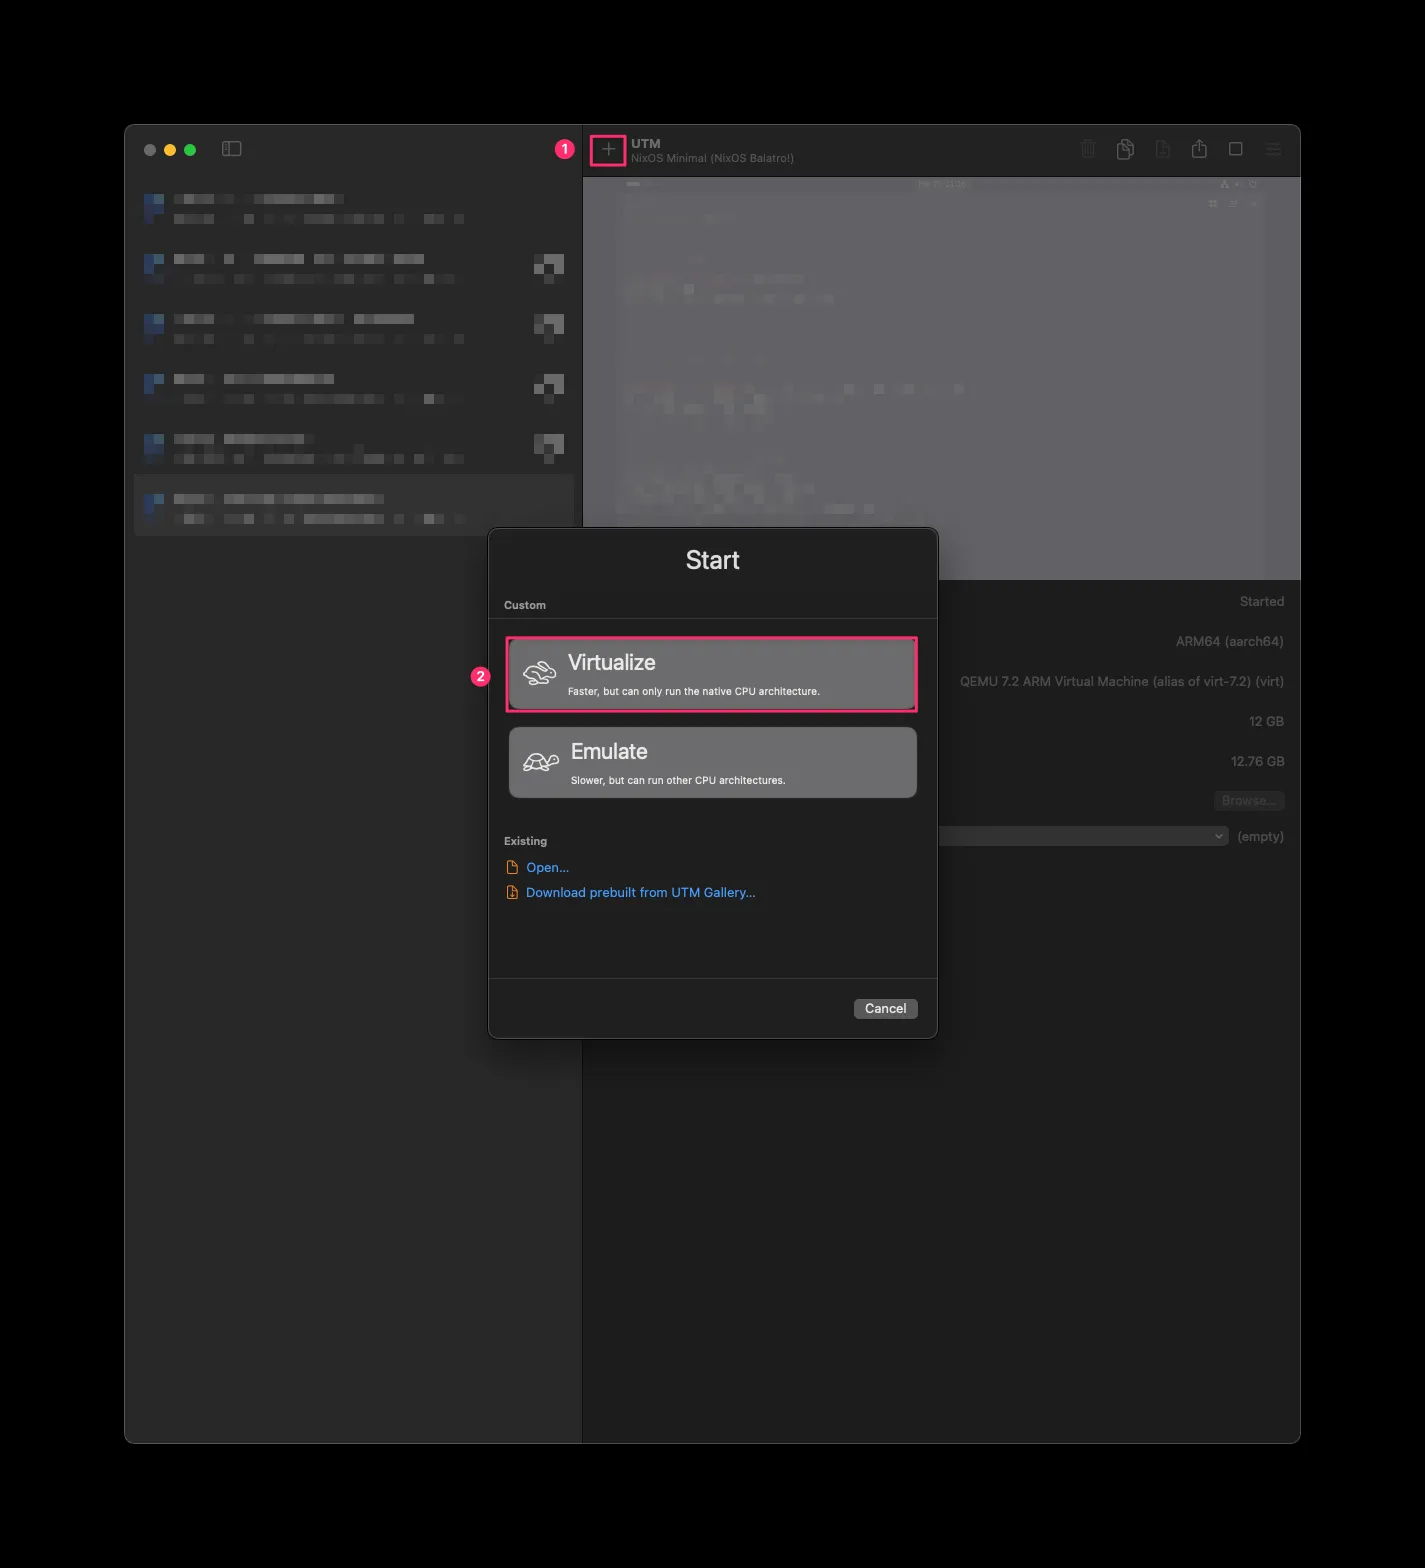
Open UTM and click +, then select Virtualize.
A pre-requisite for running in virtualize mode is that both CPU architectures (the host and the guest) be the same. MacOS Silicon is
aarch64, so we downloaded the 64-bit ARM version of NixOS to go with it.
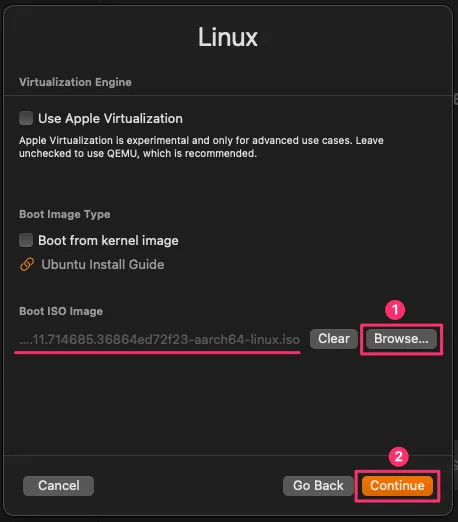
Select Linux.
On Boot ISO Image, select the just-downloaded ~/Downloads/latest-nixos-minimal-aarch64-linux.iso and click Continue.
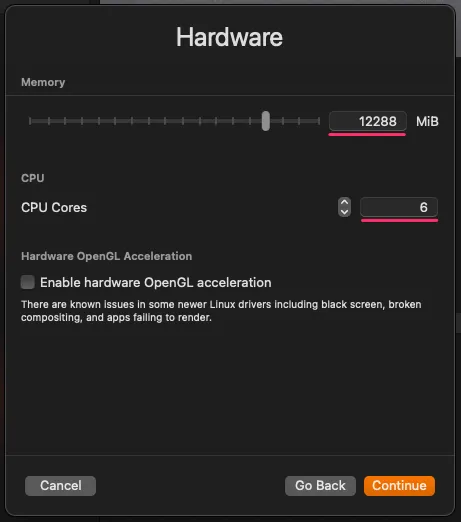
For Hardware, my MacOS has 16GB of memory and 8 cores. So I decided to share 12GB of memory and 6 cores with the virtual machine.
And finally for Storage I specified that the drive can grow up to 100GB. It will not take the whole 100GB immediatelly, it just mean it can grow until this size.
Shared Directory: skipped.
On Summary: I change the name to “NixOS Minimal Template”, check Open VM Settings and click Save.
In the details screen that opens, I make the following modifications:
-
Information: Select Operating System, click Choose, change the icon to the NixOS logo.
-
Input: Activate USB Sharing and increase the maximum shared USB devices to 6 (arbitraty number, I just felt 3 was too low).
-
Display: Scaling, Upscaling: Linear Select Retina Mode.
Finally click Save.
Start the vm clicking in the play button.
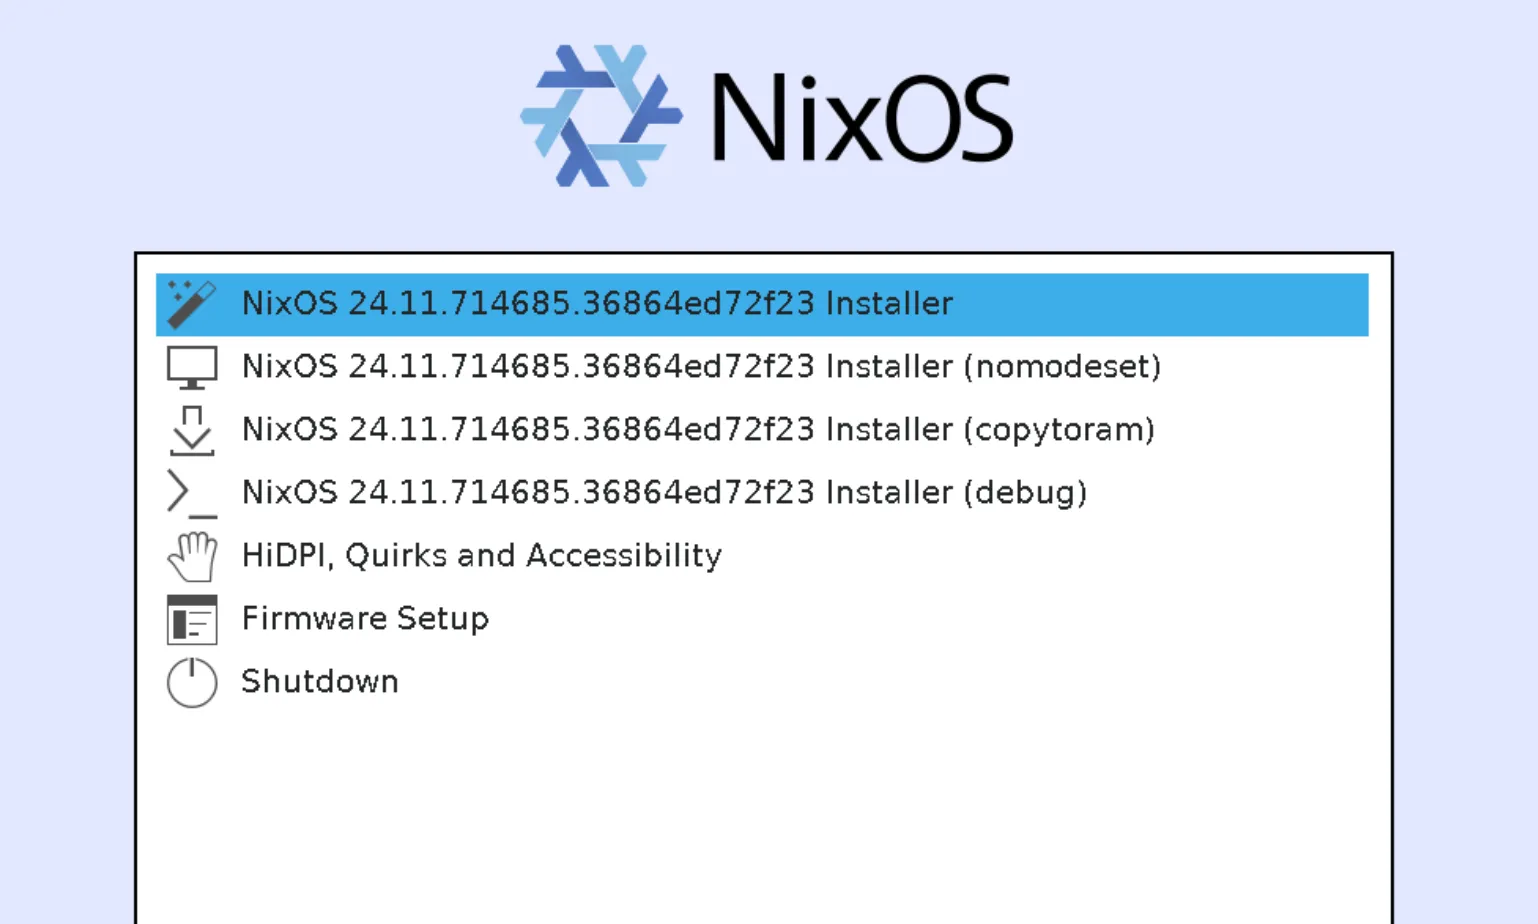
The guest will start the install disk and display a menu. Select the first option, “NixOS 24.11… Installer”
The screen will go black for some seconds and come back with a terminal.
Then execute the following:
# Switch to root
sudo su -

# Check blocks
lsblk
It should display something like:
NAME  MAJ:MIN RM SIZE RO TYPE MOUNTPOINTS
loop0   7:0    0 1.1G  1 loop /nix/.ro-store
sr0    11:0    1 1.2G  0 rom  /iso
vda   254:0    0 100G  0 disk
Find the disk row, which in my case is the 3rd one. The name is vda, so it is located at /dev/vda.
Lets use the fdisk tool to format and partition the disk.
We will add a GPT partition table and configure the partitions like following:
| Number | Size | Type |
|---|---|---|
| 1 | 500MB | EFI System |
| 2 | 4GB | Linux swap |
| 3 | remaining | Linux filesystem |
fdisk /dev/vda
The fdisk prompt will appear. You can execute m if you want to check the help. I will already include current options below to be easier to follow. Lines starting with # are personal commentary which should not be executed.
#  ---- Create GPT partition table ------------
Command (m for help): g<Enter>

#  ---- Create partition 1 --------------------
Command (m for help): n<Enter>
Partition number (1-128, default 1): <Enter>
First sector: <Enter>
Last sector: +500M<Enter>

Command (m for help): t<Enter>
Partition type or alias (type L to list all): L<Enter>

# Verify which one is EFI System. In my case it is 1. Press q to leave the list.
Partition type or alias (type L to list all): 1<Enter>

#  ---- Create partition 2 --------------------
Command (m for help): n<Enter>
Partition number (default 2): <Enter>
First sector: <Enter>
Last sector: +4G<Enter>

Command (m for help): t<Enter>
Partition number (1,2, default 2): <Enter>
Partition type or alias (type L to list all): L<Enter>

# Verify which one is Linux swap. In my case it is 19. Press q to leave the list.
Partition type or alias (type L to list all): 19<Enter>

#  ---- Create partition 3 --------------------
Command (m for help): n<Enter>
Partition number (default 3): <Enter>
First sector: <Enter>
# This time we do not specify the size
Last sector: <Enter>

Created a new partition 3 of type 'Linux filesystem' and of size 95.5GiB.

# Since the type is already the desired one, there is no need to change the type this time.

#  ---- Write partition table to disk ---------
Command (m for help): w<Enter>
The partition table has been altered.
And we are back to the prompt.
Now we execute:
# Format partition 1 with FAT filesystem
mkfs.fat /dev/vda1

# Make the partition 2 as swap and activate it
mkswap /dev/vda2
swapon /dev/vda2

# Format partition 3 with ext4 filesystem
mkfs.ext4 /dev/vda3
Now lets mount them.
# Mount partition 3 (ext4) on /mnt
mount /dev/vda3 /mnt

# Create a new directory boot inside /mnt to serve as mount point
mkdir /mnt/boot

# Mount partition 1 (EFI) on /mnt/boot
mount /dev/vda1 /mnt/boot

# Enter inside /mnt and generate a NixOS initial configuration
cd /mnt
nixos-generate-config --root /mnt
It will generate 2 files inside /mnt:
etc/nixos/configuration.nix
etc/nixos/hardware-configuration.nix
Finally, install the system:
nixos-install
It will take some minutes installing everything that is needed and when it ends, it will ask for a new password for root. Set the new password.
Then reboot the system.
reboot
Since we are in the VM, it will reboot again to the same screen with the “NixOS 24.11… Installer”. Move the cursor so it doesn’t automatically selects the option. Go back to UTM window and eject the CD:
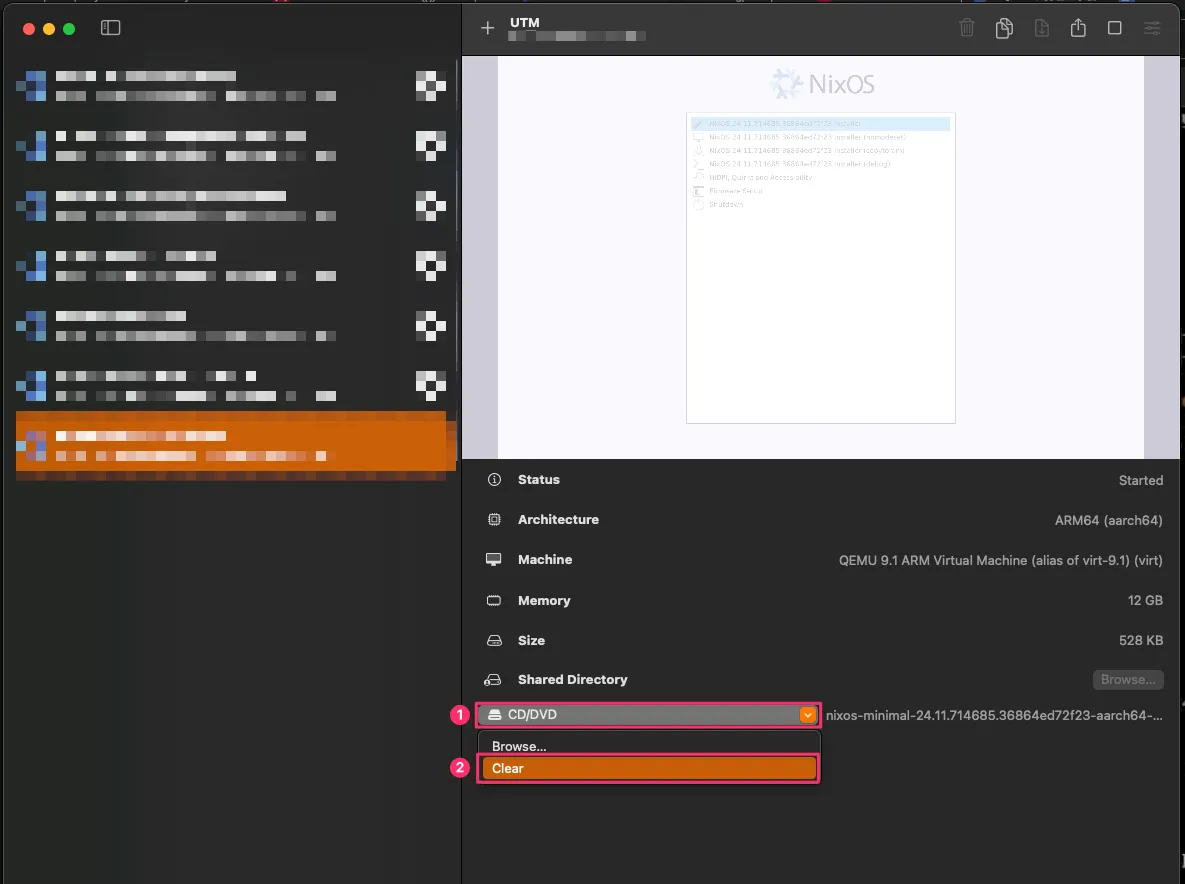
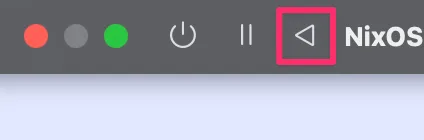
Then stop the vm and start it again. Or click on the restart button:
This time it boots to the systemd-boot boot loader screen.
Login with the root account and the password you just set.
If we already had another NixOS available, we could have used my previous blog post explaining how to use nixos-anywhere to bootstrap a new machine from scratch with way less manual intervention. But since this time the focus of this post is to run NixOS in a vm inside MacOS, this is the way I found to install it manually. If we had the nix package manager installed on MacOS already, we could have used nixos-anywhere I guess, but since we are assuming no strings attached this time, we are not going through this route to leave MacOS alone for now.
Now might be a good time to clone the current vm, in case we mess something and need to go back to a clean slate.
❄️ Installing git and enabling flakes
Let’s continue by cloning the NixOS Balatro repository, the configuration I created for my friend to test it.
But first, we will do one last adjust to the current configuration in order to be able to clone.
Go to /etc/nixos and edit configuration.nix using nano.
cd /etc/nixos
nano configuration.nix
Go down in the file to where there is a commented out part like this:
# programs.firefox.enable = true;

# List packages installed in system profile. To search, run:
# $ nix search wget
# environment.systemPackages = with pkgs; [
#   vim # Do not forget to add an editor to edit configuration.nix!
#   wget
# ]
Uncomment the environment.systemPackages and let’s add git and also enable some experimental features. Take the chunk of the file that I reproduced above and make it like this:
# programs.firefox.enable = true;

nix.settings.experimental-features = [
  "nix-command"
  "flakes"
];

# List packages installed in system profile. To search, run:
# $ nix search wget
environment.systemPackages = with pkgs; [
  git
]
Save with CTRL+O and exit with CTRL+X.
Then let’s rebuild the system with this new configuration:
nixos-rebuild switch
If everything goes well, a message saying activating the configuration... should appear, followed by some reloads, restarts and started units.
🧬 Cloning the nixos-balatro
cd /etc
git clone https://codeberg.org/claudiofreitas/nixos-balatro.git
cd nixos-balatro
The hardware-configuration.nix of nixos-balatro was created inside a NixOS vm with the same steps I described in this post. However, just in case, replace the nixos-balatro’s with the one that NixOS generated for this specific vm:
rm hardware-configuration.nix
cp /etc/nixos/hardware-configuration.nix /etc/nixos-balatro/hardware-configuration.nix

# You can use git status and git diff now to verify if there was any change. For me, the uuid of the partitions were different, so it was safer to replace! ⛑️
Next we rebuild the system once again, but this time using the nixos-balatro configuration. This time we are using flakes (we enabled it in the previous rebuild), so the command is slightly different.
nixos-rebuild switch --flake .#balatro
The default nixos-rebuild without using flakes considers that the configuration is on /etc/nixos/configuration.nix. With flakes we are not limited to keeping the configuration there. The command above instructs NixOS that the configuration is inside the current directory (.), and instructs it to use the specific one called balatro. Look inside flake.nix inside the outputs and we will indeed see the following chunk:
nixosConfigurations."balatro" = nixpkgs.lib.nixosSystem {
⏰ This rebuild took me around 3 minutes to complete.
Reboot the system.
reboot
After the reboot finishes, wait some seconds for the Gnome login screen to appear. The initial password of the slims user is also slims. Let’s change the password and also bootstrap some configurations I prepared.
# Change the password
passwd
# Current password is 'slims'

# Bootstrap Balatro!
./balatro

# Change to root
sudo su -

# Move the configuration to the user folder
mv /etc/nixos-balatro /home/slims/nixos

# Change the user and group recursivelly for everything inside /home/slims/nixos
chown -R slims:users /home/slims/nixos
🧪 Experimenting
Now lets experiment installing a new package.
Go to https://search.nixos.org/packages?channel=unstable and look for cowsay.
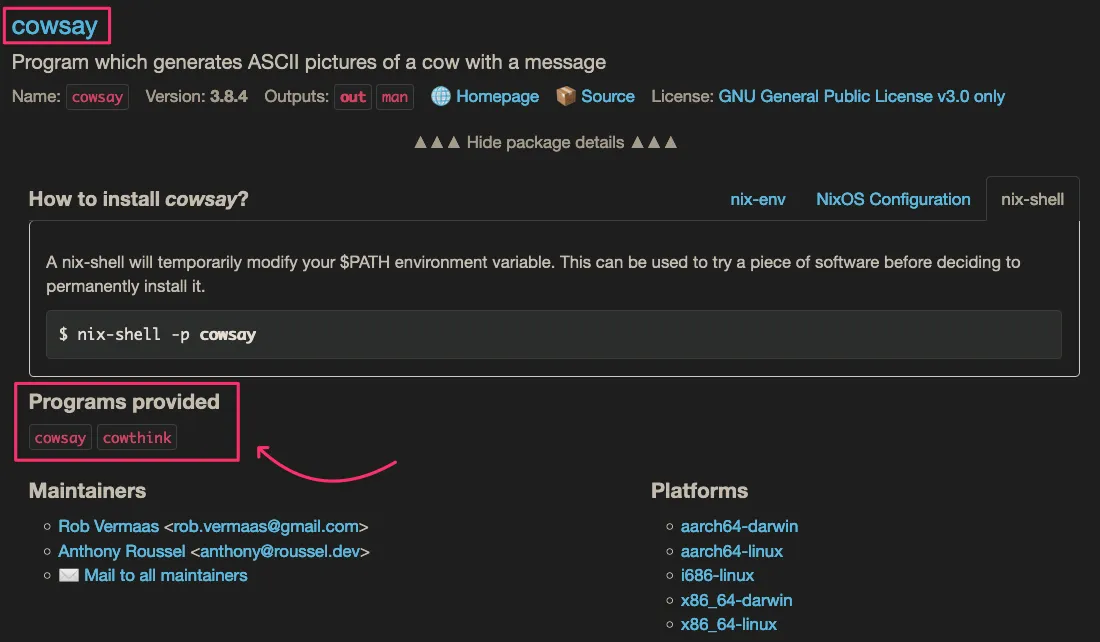
We can see that the package cowsay comes with 2 executables: cowsay and cowthink.
Drop back to the user slims’ terminal with CTRL+D if you are still inside root.
Then try:
cowsay
It should display that the command is not found, because we do not have cowsay installed on this system. Same for cowthink.
Suppose that you just wanted to experiment cowsay but you don’t want to commit to having it installed into the system. We can install and enable it just for the current terminal session like this:
nix shell nixpkgs#cowsay

cowsay Diversity, equity and inclusion!
The result will be
 __________________________________
< Diversity, equity and inclusion! >
 ----------------------------------
        \   ^__^
         \  (oo)\_______
            (__)\       )\/\
                ||----w |
                ||     ||
If we drop from the current session with CTRL+D, and try cowsay again, it will go back to saying the command is not found. This is very useful when we only need it once or when we are just trying and don’t want to immediatelly install it. If this is the only time we use it, eventually it will be garbage-collected by NixOS in the future.
💾 Installing permanently in the configuration
Edit system-packages.nix. Now we have neovim available to edit it if we wish.
nvim system-packages.nix
Include cowsay without any quotes inside the systemPackages array.
environment.systemPackages = with pkgs; [
  # Terminal related
  # ...some packages here
  cowsay

  # ...more packages here
];
Save, exit, rebuild the system.
sudo nixos-rebuild switch --flake .#balatro
Using flakes allows us to leave the configuration outside of /etc/nixos, but the nixos-rebuild still needs admin permission to be executed, hence the
sudothis time.
Now we try cowsay again and it is installed into the system.
cowsay NixOS!
 ________
< NixOS! >
 --------
        \   ^__^
         \  (oo)\_______
            (__)\       )\/\
                ||----w |
                ||     ||
And that’s it! Other configuration options can also be searched on https://search.nixos.org/options?channel=unstable similarly to how we searched packages. Understanding the nix language is whole new animal, which I will not attempt to explain in this blog post 😅
📖 References:
- Why Does Nothing Work https://www.youtube.com/watch?v=63sSGuclBn0
- NixOS & Flakes book https://nixos-and-flakes.thiscute.world/nixos-with-flakes/introduction-to-flakes
- Building a Rust service with Nix https://fasterthanli.me/series/building-a-rust-service-with-nix